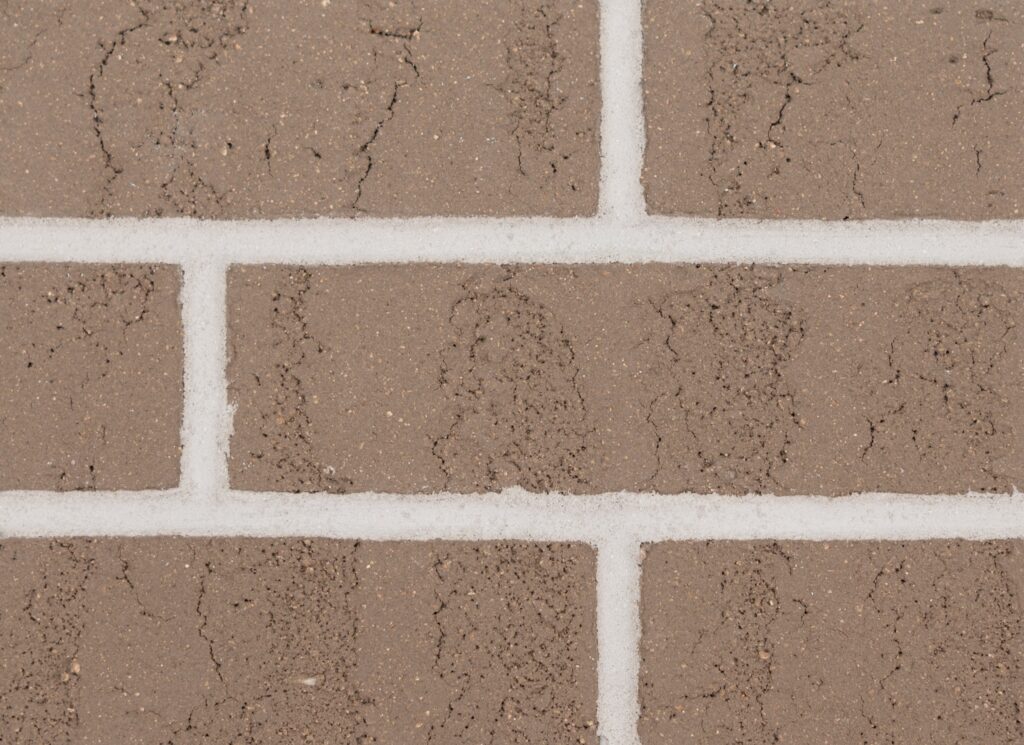
Genuine Brick Look, Continuous Insulation, Cost Effective
Finally a brick look system that is cost effective and actually looks like brick! Master Wall Inc.® CIFS® Brick is an application technique that quickly and easily recreates brick, but with the advantages of color control and repeatability. The finish surface is formulated with 100% acrylics for long term durability and is applied over a continuous insulation.
- Consistent color and color choices
- Far lower installed costs compared to thin brick or foam brick installations
- Stencil application covers large areas, not a brick at a time
- Each brick has a unique texture
- Easily add color variations
- Hand-tooled mortar joints
- Mortar is warranted by Master Wall®
- Continuous Insulation
Systems
Rollershield Drainage CIFS®
Aggre-flex Drainage EIFS
Aggre-flex EIFS
Application Conditions
Temp: 40°-110°F (5°-43°C)
Working Time: 1/2 hr
Dry Time: 24 hrs at room temperature, working and drying time will vary with temperature and humidity
Materials and Tools Needed
- CIFS® Brick Stencil, custom sized in desired pattern, self-adhesive
- Master Wall® Taratex Specialty Coating tinted to desired color
- Mixing drill and paddle
- Stainless Steel or Plaster Trowel
- Taratex Accent Colors (if needed)
- Spray bottle with water
- Grout Sponge
- Master Wall® CIFS® Brick Mortar
- Master Wall® CIFS® Brick Additive
- Grout Bag or Brick Mortar Gun
- Stainless Steel Brick Joint Tool
- Stainless Steel Brick Pointing Trowel
- Dry Brush
Approved Substrates
- Interior Drywall
- Master Wall Base Coats
- Others approved in writing
Application Procedure
Contact your Region Manager for techniques.
Job Conditions – Air and surface temperatures must be 4°C (40°F) or higher and must remain so for a minimum of 24 hours. Avoid exposure to direct sunlight during application. Protect the finish from rain and temperatures less than 40°F (5° C) for a minimum of 24 hours after finished application.
Surface Preparation – Interior Drywall: smooth, flat and ready for paint. Clean the surface in preparation for Taratex. Prime wall with Primecoat Primer and allow to dry. Exterior: Master Wall® base coat shall be smooth and free of any mesh pattern.
Stencil Application – Adhere the CIFS® Brick Stencil to the wall in the selected pattern.
Mixing – Open pail of Taratex and mix approximately one minute with a fixed wheel type paddle or equivalent mixing blade attached to a 1/2” (13 mm) heavy duty drill at 400-500 rpm. Small additions of water, up to 240 ml (8 oz.) per pail, may be added for workability as needed.
Finish Application – Apply Taratex with a standard stainless steel plaster trowel or Italian Trowel. Apply the first coat of Taratex level with stencil scraped down to the point to where the stencil is nearly clean. Let set up about 30 minutes before applying a second coat of Taratex. Let set for 30 minutes then draw tight with the edge of the trowel (90° to the surface), scraping and creating pits and variations on the surface. As the Taratex sets up further, spray the surface with water and slick down (Trowel parallel with the surface). Immediately remove the stencil and wait 12 hours at room temperature before beginning mortar application.
Finish Accent Application – If additional accents are desired, apply colored Taratex using a sponge on random brick to create the desired variation.
CIFS® Brick Mortar Application – Mix the CIFS® Brick Mortar and CIFS® Brick Additive to a creamy consistency and place into a grout bag or brick mortar gun with opening sized to the stencil mortar size. Squeeze into the mortar areas of the stencil taking care to completely fill the opening with a slight crown in the middle. Let firm set thumbprint hard, then tool with the brick joint tool. Wait approximately 30 minutes and remove any remaining excess with a dry brush using light pressure while the mortar is still soft.
Protect from weather and adverse conditions for 72 hours before putting into service.
Cautions and Limitations
Slope all exterior surfaces 1:2 minimum to shed water.
Application in direct sunlight may affect aesthetics if the Taratex dries too quickly. Avoid direct sunlight.
When cleaning do not use harsh or abrasive cleaners. Wash gently using a soap and water solution followed by a warm water rinse.
Clean Up
Tools and equipment can be cleaned with soapy water while the Taratex or Mortar are still wet.
Information contained in this product data sheet conforms to the standard detail recommendations and specifications for the installation of Master Wall Inc.® products and is presented in good faith. Master Wall Inc.® assumes no liability, expressed or implied as to the architecture, engineering, or workmanship of any project. This information may be concurrent with, or superseded by other applicable documents, such as specifications and details. Contact Master Wall Inc.® for the most current product information. ©2018 Master Wall Inc.®